Book List – Update January 2022

Ten years ago I started a book list, and in 2014 I provided an update. After some years of radio silence I’ve updated it once more: check out my Book List Page! And let me tell you a bit about the diff between then and now in this post.

First up, here’s a quick glance of the current list:

Screenshot of 2022 Book List covers of recommended books. Total 20 covers a bit blurred together, some jumping out because of their cover (e.g. "Don't Make Me Think", "Culture Map", "Death March", "Influence", "TED Talks").

I’ve reorganised the list once more. Shown above is my current list of “Recommended” books. These books more or less follow these guidelines:

  • I’ve read them, and enjoyed them thoroughly;
  • I’ve learned something from them;
  • They are directly or indirectly helpful for a software developer (or related);
  • They are important to read, for one reason or another;
  • They’re timeless, at least to a degree.

All of those books are also described with a mini-review for each. Some of the reviews dating back from 2014 or earlier. Some of them written just now, for the updated list.

My Book List also has two extra categories. First, there’s “Recommended, with caveat“: books I think are (usually) good to read, if you know the caveat. Then finally there’s a list of books I’ve read and I have not regretted doing so, but they are not on my “top” list: “Good, but not great“.

Curious to know when my next major update to my book list is forthcoming? So am I!

EmpGrid Post-Mortem (and Resurrection!?)

This post is about my pet project EmpGrid. But first a short story about how I work.

About Promises

I try to be extremely precise with promises. In fact, you could say my Promises work very much like the native JavaScript promises. Let’s look at some code:

We can note some things about that code:

  • The promiseSome(thing) bit should always complete successfully, and always return a real, concrete promise;
  • After that, the then(...) bit will be executed nearly always, i.e. typically a promise resolves successfully;
  • Only in exceptional cases, with a typically well-defined error, will the catch(...) occur.

And that is exactly how real-life promises work for me too. I want people, most notably me, to be able to count on a promise being fulfilled (given normal circumstances).

So, why is this relevant to EmpGrid? Well, I promised myself this for 2018, Q3:

Finalize EmpGrid: finish it XOR do a postmortem

So, this post is that finalization. Because I promised!

EmpGrid Post-Mortem

Since I have not fully finished EmpGrid, the only option I have to fulfill my promise is to write a post-mortem about it.

The idea behind the project remains the same since its inception. It should be a self-contained web application that shows for a group of employees (colleagues) where you can find them online. Typically, you’d be interested in all their “Presences”, ranging from social media (Twitter, LinkedIn) to version control sites (GitHub, GitLab, etc.).

The intended side-effects of the project also remained the same. The repository should be slightly over-engineered, since it should serve as a playground to test technologies useful in larger applications. At least for the server-side bits; client-side a first version could do with a very simple monolithic single page application.

If you clone the repository today, you get a mostly functional thing. You should be able to run it out of the box (given you have a modern .NET Core development setup), and do some CRUD stuff. However, it is not at all “finished”. So, I’m declaring the project dead today, Saturday, September 22nd, 2018.

Here’s what’s still sorely missing:

  • Some kind of user management. Currently, you can only use the built-in seeded admin user with default password. You should at least be able to change the admin’s password. But really you should also be able to create logins linked to Emps, so that people could edit their own details.
  • Persistence. I really wanted to step outside the default EF Core solution that .NET Core pushes you towards. Instead, I would like to see some kind of open source document database integrated. Just haven’t gotten around to it.
  • Cloud-deploy-friendliness. It should be a breeze to deploy the app as a single unit, while still giving a clone-and-run developer experience. Possibly Docker would come in to play.

In addition, there’s a bunch of smaller to do items in the readme left. But the bottom line is: it’s not finished yet.

And that’s okay! Because I learned a lot while building it. Also, the truth is that I spent my time elsewhere past months. And that was a conscious (and wise) choice.

Still, I’m a little sad to declare EmpGrid dead before it got up and running somewhere…

Resurrection?!

So perhaps I should resurrect the project?

Well, not immediately. Or, more specifically, I will not promise that it’ll be resurrected. For one, I’m due for a long, relaxing vacation to Sri Lanka. And second, I see several other cool ventures coming up (hello Advent of Code!!). So perhaps EmpGrid will stay dead.

Or maybe I need a partner in crime?

Time will tell. For now: good bye, EmpGrid. Hibernation mode: on.

Getting to the .NET Core of Things

Getting to the .NET Core of things

This post aims to help developers from other tech stacks get up to speed with .NET Core. It should be enough to follow further discussions of this tech stack, as well as help you decide whether it’s something you might want to investigate further.

Introduction

Microsoft’s tech stack (for various types of applications) has been .NET for over 15 years now. For the most part of those 15 years, Microsoft has exclusively focussed on proprietary, Windows-only software. In recent years Microsoft shifted to open source and cross platform solutions in many areas, including .NET. With that, the newest incarnation of .NET is .NET Core, which is completely open source and available across various platforms.

This post explains the state of Microsoft’s tech stack, from the perspective of this new “.NET Core”.

Note on versions: this post was written when .NET Standard 2.0 and .NET Core 2.0 have just come out. Most information also holds for earlier versions, but unless specified otherwise, all text and code below assume version 2.0 to be the context.

How .NET traditionally worked

Let’s first investigate how .NET in general works, with the pre-.NET Core context in mind.

As a developer, you can write some C# or VB.NET code. When you compile this code, you’ll get IL (Intermediate Language), which is bytecode. This bytecode is packaged in DLL and possibly EXE files, which runs on any computer. Well, technically it runs on any computer… that has the .NET Framework to run it. Remember, talking pre-.NET Core here, so this “any computer” has to be a Windows machine with the proper version of the .NET Framework.

The part of .NET that actually runs the application is the CLR (Common Language Runtime). Included with the CLR is a GC (Garbage Collector) and other memory management tools. Another important part of the .NET Framework is the BCL (Base Class Library) which contains essential base libs, for example for collections, IO, XML handling, etc.

In addition, .NET itself also used to ship with application frameworks. For example frameworks for desktop applications (WinForms and WPF), as well as web application frameworks (ASP.NET). This has changed in recent years. Now, almost all application frameworks (including ASP.NET MVC), are distributed as packages. This is done using the NuGet package manager, where application frameworks live as siblings to other libraries and SDKs. Note that Microsoft’s packages sit there along the third party packages.

And that’s all the basics for building .NET applications traditionally. With that out of the way, let’s move on to the interesting bits.

Terminology

The best way to start explaining about the “new” .NET situation is by building a glossary.

Terminology around .NET Core has been very confusing for quite some time. But since around halfway through 2017 it seems things are coming together. I’ve left all obsolete terms (Hello there, “DNX”!) for an appendix at the end, and will first focus on current terminology. Here’s a quick overview of the important terms.

Let’s start with the most important thing, which is in my opinion is not “.NET Core”. It is .NET Standard, which simply specifies an API. It lists all the (namespaced) types and methods you should implement to create a .NET Implementation (sometimes also referred to as a “.NET Framework” or a “.NET Platform”).

So what .NET Implementations are there then? Several! First, the most well-known one is the .NET Framework, which is available only for Windows.

Second, the .NET Framework framework has been ported, and this (cross platform) port is known as the Mono framework. Today Mono is not only port, but it is in fact also explicitly a .NET Implementation by implementing the .NET Standard officially.

Third, there’s Xamarin. Now there is a company named “Xamarin” (now owned by Microsoft), which develops similarly named platforms: Xamarin.iOS and Xamarin.Android.
These are both versions of Mono for their respective mobile platforms. Recent and upcoming versions of Xamarin.iOS and Xamarin.Android will be .NET Implementations that conform to the .NET Standard too.

Fourth and finally, let’s get to the main topic: .NET Core. This is a cross-platform .NET Implementation by Microsoft, conforming to the .NET Standard. Moreover, it’s completely open source, with most parts using the permissive MIT license.

Basically Microsoft re-implemented the Windows-only .NET Framework in the cross-platform .NET Core, where overlap between the two is specified by .NET Standard. Note that large parts of .NET Core are forked from the .NET Framework.

Within .NET Core there are two other important terms. First, CoreCLR is the Common Language Runtime (CLR) of .NET Core. This is the part that runs your .NET Core applications, takes care of memory management, etc. Second, CoreFX is the Base Class Library (BCL) of .NET Core. It contains the basic types such as those around collections, IO, xml handling, etc. All of these bits and pieces are available cross-platform.

With those terms laid out, let’s dive into the details.

.NET Standard

The .NET Standard API specification for .NET Implementations has different versions. The code and documentation can be found on GitHub, which also shows which implementations conform to each version of .NET Standard. Here’s a trimmed down version of the current overview:

.NET Standard versions

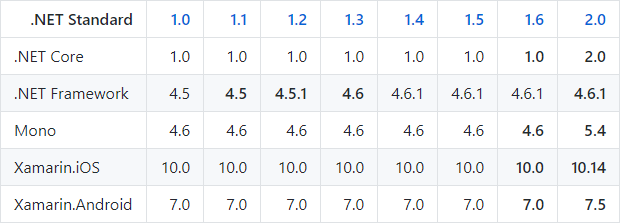
For example, from the above you can tell that .NET Core 1.0 implements .NET Standard 1.0 through 1.6. And as another example, .NET Standard 2.0 is implemented by both .NET Core 2.0 and .NET Framework (the Windows-only one) 4.6.1.

You can easily check what’s in a specific version by checking the markdown-based docs for all versions. It includes “diff” files showing what changed since the previous version. For example, this API was added to .NET Standard going from 1.6 to 2.0:

Now for the important part! When writing .NET code, you can choose what your intended target (“Target Framework“) is. But this does not need to be a .NET Implementation.
You can also target .NET Standard!

But “Why would you target a spec, which cannot run anything?”, you might ask. The main reason to do that would be when you’re writing some kind of library.

For example, suppose you’re targeting .NET Standard 2.0 with your hip new FooBar library. By using .NET Standard as a Target Framework you’re basically saying: anyone running an app on a .NET Implementation supporting .NET Standard 2.0 can use my library.

Now suppose you are a library or framework author who publishes things on NuGet. You then have to specify what Target Framework your code’s compatible with. So from NuGet we can extract interesting statistics, and see that the community is really getting on the .NET Standard bandwagon. Most popular libraries already support even from some 1.x version onward of .NET Standard (usually 1.3 or 1.6).

In addition to explicit Framework targeting, there’s something specific for .NET Standard 2.0. A “compatability shim” was also rolled out in the tooling around packages, meaning you can use any library that is de facto API-compatible with .NET Standard 2.0. Even if the author didn’t explicitly declare it to be compatible. And although this might seem dangerous, it works pretty well in practice, allowing for application authors to switch more quickly to .NET Core if they want to.

.NET Core

This is where things get cross-platform! You can download the SDK for Windows, various Linux distributions (e.g. RHEL, Ubuntu and Mint, SUSE), and Mac OSX. The SDK contains both the CoreCLR (runtime) to run applications, as well as the tools needed to create and build applications.

After installing you can use the command line interface to test everything is working. Just:

  1. Create a folder “hellow” and cd into it;
  2. Execute dotnet new console, which generates:
  3. Execute dotnet run;

And you should see the traditional “Hello World!” greeting now.

To move beyond the CLI to using an IDE for development, there are several choices.

  • Visual Studio is still probably the best experience on a Windows machine.
  • VS Code is available on Windows, Mac, and Linux, offering a pretty light-weight IDE.
  • JetBrains Rider is an Intellij-like IDE for .NET development, available on Windows, Mac, and Linux.

Any code you compile, on any OS, with any IDE, should be runnable on .NET Core on other OSes. If .NET Core is installed on that OS.

You can also create “self-contained applications”: applications that include the .NET Core runtime as well. Obviously, then you need to specify the platform to target because .NET Core binaries are platform-specific. You do this by publishing with a Runtime Identifier (RID) like “win10-x64“, or “osx.10.12-x64“, or “linux-x64“. This will compile your .NET Core application and bundle it with the appropriate version of .NET Core itself.

And that’s really all there is to it. From here on out it’s all about writing code in a .NET language of your choice. This means C# or F#, or VB.NET in the near future.

Wrapping Up

Microsoft is changing up their game. Although the traditional .NET Framework is here to stay, the new .NET Core framework is the future. They are both .NET Implementations and yes: they have overlap (as defined by .NET Standard). But you can safely bet on the fact that .NET Core and .NET Standard are going to get focus forward.

Given that all these efforts are both open source and cross-platform, riding along that train seems like an excellent idea. Especially if you’re currently using another tech stack, but interested in the .NET ecosystem, now is a great time to hop on and join for the ride!

Just give it a go!

~

This post formed the backbone of my talk at DomCode 2017-08-29. By and large it can be considered a transcript of that talk. If you want you can also download the slides of my presentation.


Appendix A: Bonus Topics

There are plenty more in-depth and advanced topics. Here’s a quick list of particularly interesting ones you could further pursue:

  • Docker and .NET Core go very well together. The official docs on that should be a good starting point.
  • EF Core (Entity Framework Core) gets a lot of attention too. EF is Microsoft’s ORM framework, and it has its own dedicated (sub)site with more info.
  • UWP (Universal Windows Platform) for creating Windows Store apps that could be cross platform (including things like Xbox, Windows Phone, HoloLens, etc) will also likely conform to .NET Standard. Check the main UWP docs for further info.
  • Roslyn is the code name for the open-source compilers for .NET languages. The best starting point for more details is the Roslyn Github repo.
  • .NET Native will allow you to compile your .NET code not to IL (bytecode), but to platform-specific native code. Check the official docs for more info.

Appendix B: Obsolete Terminology

Here’s a short list of (currently) prominent terms that I consider to be obsolete, along with their definition (and the source of that definition, if applicable).

  • DNX (Dotnet Execution Runtime), DNVM (script for obtaining DNX) and DNU (Dotnet Developer Utility) were part of older Release Candidates of .NET Core. The features have mostly been moved to the .NET Core CLI. See the Microsoft docs for more info.
  • project.json was meant to be the new project system, but instead Microsoft decided to move back to csproj files with some new features. Read more on these Microsoft docs pages.
  • PCL (Portable Class Library) was an earlier attempt to help library authors create code that could be reused across various fameworks and platforms. The best reference I could find is these docs from Microsoft. In light of .NET Core you can easily forget about it though, unless you need to convert a PCL project to .NET Core.
  • vNext (which at some point was also called ASP.NET 5) can best be seen as a working title of the next .NET Framework version (the one for Windows only), but has been dropped entirely. About the only semi-sensible reference left is on Stack Overflow.
  • ASP Classic is not really an obsolete term, but rather obsolete technology. The latest stable release was from around the year 2000. It has nothing to do with .NET or the various ASP.NET application frameworks. Wikipedia has a quick history recap if you want it.

References

LPIC-1 Exam 101 Study Plan

I’ve worked almost exclusively with Windows machines for the past years. However, this is changing rapidly (by circumstance, mostly) at the moment. So the time was never better to start a deep dive into Linux.

As you can see from my past Study Plans, I’m a big fan of “breadth-first” learning. I’ll go into a focused, meticulous, relentless grind starting at the very beginning. I plan to do the same for my Linux studies.

Certification Downsides

I will mention two major problems with certifications though:

  1. The certificates are near to worthless.
    Cheating your way through is commonplace, especially at companies that care only about being able to charge more for an employee because they’re certified. The only “worth” of a certificate lies in the fact that it reminds you that you’ve passed it fair and square.
  2. They tend to test a lot of silly or unimportant knowledge.
    Experts will tell you that many things you need to know to pass an exam are things they will in reality actually have to look up. Knowing whether method so and so returns an INT or BIGINT is useless, in real scenarios you’ll have an IDE or documentation to tell you this.

But for me striving to pass an exam is worth it nonetheless. Following exam objectives closely gives me confidence that I’ve got a solid basis, and frees me of having to spend any mental-cpu-time on monitoring that. I want to cover as close to 100% of the important topics as possible, and I guess covering 130% worth of material is one way of doing that.

Here’s a visualization of what I mean:

Venn diagram of Study Plan Coverage

The blue area covers the green area for the most part, and it takes zero time to use it as a study guide. The red area is a plan I would probably create myself composing it from various resources. But creating it would cost me many hours, and is more likely to leave serious gaps.

So I’ve decided that going with exam objectives as a guide is a sane choice for me.

The Actual Plan

So how about the actual plan? Isn’t that basically the objectives from the website then? Well: yes and no. I also like to publicly share my plan, for two reasons:

  1. The main reason: it gives me confidence I’ve got a solid plan.
  2. Secondary reason: others might find it useful.

In addition, as a side effect, I guess it motivates me: feeling that “others” are watching my progress makes me want to complete everything. Regardless of whether there are such “others”.

This time around I tried something different from the previous Study Guides. I’ve used Trello to catch the study plan. You can check out the public board yourself. Here’s a screenshot:

LPIC-1 101 Study Guide Trello Board

Personalizing The Plan

Finally, you can easily copy this board and use it as a starting point for your own studies. This is quite easy to do:

Copy Trello Board
Copy Trello Board

It’s exactly what I have done, and you can follow my progress on Trello.

And now that I’ve told you about this, dear reader, I will have to complete my studies…

Using SourceTree’s Pageant with git in Powershell

I’m trying to use these tools in conjunction:

  • Powershell 5 on Windows 10
  • Git version 2.13.0.windows.1
  • Keepass 2.35 with the KeeAgent plugin to fire up Pageant
  • Putty 0.69
  • I also have SourceTree version 2.1.2.4 installed

I’ve generated a public/private key pair, loaded the public key in GitLab, GitHub, Bitbucket, and other places. I’ve loaded the private key in Pageant via KeeAgent successfully and I can see the fingerprint is correct.

Now, if I try to do git pull from Powershell I get this:

However, if I place id_rsa (an OpenSssh file generated with Putty) in my user’s .ssh folder then git pull works, but it will ask for the passphrase *every time*.

Now if I use SourceTree I can pull changes just fine! So what was the problem?

Apparently, this solution by user @CTS_AE works just fine: you have to add a System Environment Variable called “GIT_SSH” that points to “plink.exe”. For me:

GIT_SSH System Variable

Restart your Powershell session and voila: pulling in changes from the command line works again!


Footnote: If you get stuck at “Store key in cache? (y/n)” with no input from the keyboard being registered then this solution by @cambunctious might work. Just open Putty, try to SSH into bitbucket.org, and use the GUI to add the fingerprint. Silly, stupid, but it works.

AutoMapper: Missing type map configuration

While trying out AutoMapper I stumbled on this generic error:

Message: AutoMapper.AutoMapperMappingException : Missing type map configuration or unsupported mapping.

Below is the initial Stack Overflow question I wrote, after struggling for at least 25 minutes with this problem. The solution however was shamefully simple: if you call Mapper.Initialize twice, the latter will overwrite the first.

Full Description

So why am I writing an entire post about this? Simple: to ingrain this solution into my brain, may I never make the same mistake again.

Basically, I was trying to understand a more specific version of this generic question on AutoMapperMappingException, getting the same kind of error message:

Message: AutoMapper.AutoMapperMappingException : Missing type map configuration or unsupported mapping.

Here’s a way to repro my scenario:

  1. Using VS2017, create new “xUnit Test Project (.NET Core)” project (gets xUnit 2.2 for me, targets .NETCoreApp 1.1)
  2. Run `Install-Package AutoMapper -Version 6.0.2
  3. Add the following code
  4. Build
  5. Run all tests
  • Expected result: green test.
  • Actual result: error message:

    Message: AutoMapper.AutoMapperMappingException : Missing type map configuration or unsupported mapping.

    Mapping types:
    FooEntity -> FooViewModel
    XUnitTestProject3.FooEntity -> XUnitTestProject3.FooViewModel

If I uncomment the line marked as “culprit” the test turns green. I fail to see why.

I also placed a Mapper.Configuration.AssertConfigurationIsValid() call right before the Map call but that will run without error.

As far as I can tell, the other question, specifically its top answer talks about forgetting the initialization, but that’s explicitly there. I’ve also looked through the other answers but none of them helped me.

Another top question’s answer to this same problem tells me to add ReverseMap(), but that’s not applicable for my scenario.

Solution

Only after writing the entire above question on Stack Overflow, specifically while perfecting the minimal repro, did I realize what was causing the error: the line marked as “Culprit!”. Then, buried deep in Google’s search results (okay, okay: on page 2; but who looks on page 2 of search results?!) I find this answer that has the solution. Multiple initializations should be done like this:

I guess that teaches me for disregarding the advice to use Profiles for proper AutoMapper configuration.

Learning to Linux: the Road to Becoming a Power User

Let’s first set the scene: I’m participating in an Infi study group and would have to present to colleagues about “WTF is Linux?”. Interestingly, I am a total Linux beginner, and they were ranging from intermediate to advanced skill levels. Joy!

So, what’s on the to-do list? Three things:

  1. Understand history and context of Linux;
  2. Get to know what you don’t know yet;
  3. Learn what the tools to learn more are;

Basically, I’m looking for all the things I need to get started and to keep going. Note that all this is aimed at folks that are at least to some degree a power user.

History and Context

First there was Unix, which was great, but it was closed source and not very portable. So Richard Stallman set to create a clone: GNU. However, the kernel “GNU Hurd” didn’t work out so well at the time. So Linus Torvalds wrote the Linux kernel in the 1990s, and together they now form the Operating System “GNU/Linux”, often referred to as just “Linux”. History has by now shown that GNU/Linux was far more popular than GNU/Hurd.

Before we dive into Linux itself, let’s consider its place amongst other Unix-like OSes. There are both open source ones such as Minix and FreeBSD, and closed source ones like Solaris. All of them are fully or partially compatible with “POSIX“: a standard for OSes. You can get the full picture at Wikipedia, but here’s a simpler version:

Unix-like OSes overview

Zoom in on the green “GNU/Linux” box, there turn out to be very many Distros. A distro being the Linux kernel, GNU tools, a package management system, and possibly a window system and desktop manager. Again, there’s a full picture at Wikipedia, but I made a more condensed overview:

Linux Distros Overview

The top ten distros for 2016 according to DistroWatch are as follows:

Rank Distro Package Manager Default Desktop(s) Comments
1. Mint dpkg Cinnamon, MATE, Xfce, KDE community-driven spinoff from Ubuntu with a lot of out-of-the-box multimedia stuff
2. Debian dpkg Gnome reliable Linux distro that can be used plain, but is also the ancestor for many other distributions
3. Ubuntu dpkg Unity (moving to Gnome 3) beginner-friendly spinoff from Debian, both for desktop and server environments
4. openSUSE rpm None, Gnome, KDE community program sponsored by SUSE, to promote use of Linux everywhere
5. Manjaro pacman XFCE, KDE, Gnome power and flexibility of Arch, but with a friendly installer and some more GUI stuff added
6. Fedora rpm Gnome latest and greatest features that will also go into Red Hat Enterprise Linux
7. Zorin dpkg Gnome 3 spinoff from Ubuntu for newcomers accustomed to the Windows GUI
8. elementary dpkg Pantheon spinoff from Ubuntu with the look and feel from Mac OSX with a few custom apps
9. CentOS rpm None, Gnome, KDE basically Red Hat Enterprise Linux without the enterprise license and support fees
10. Arch pacman CLI very minimalistic Linux distro, requiring the user to take control of the OS

There is also a pretty good Youtube video that gives some context about this same list.

Oh, and obviously I also have to do an honorable mention for the weirder, more “clickbaity” Linux distros: Satanic Ubuntu, Christian Ubuntu, Damn Vulnerable Linux, LinuxBBQ, Slackintosh, and Stresslinux. For the most part I have no clue what they do (if anything at all), I’ll leave that as an exercise to the reader.

What to Know

First thing to do when getting started with a new technology is finding out how much you don’t know yet. Thinking about the Dunning-Kruger effect…

Dunning-Kruger effect

… I would like to start at the Valley of Despair right away. And I’d like a clear path of that slope ahead of me. Please.

Now obviously you can’t start from zero; even reaching the Valley requires some knowledge. So investing some generic startup time seems good. Here’s a few suggestions:

But where to go from there? What is there to know? Well, there’s a few obvious resources that serve as very natural check lists:

In addition, it seemed helpful to try to do one or two nontrivial in-depth tasks in a VM, and see what you encounter. For example setting up a LAMP stack to host WordPress in a VM, or cloning a cool project and getting all dependencies (like Java, ugh!) up and running.

At the end of my research, and with help of my study-buddies, I conclude these are the few essential skills that I’m missing to be productive with Linux as a developer or sysadmin:

  1. Command Line. Without solid knowledge here you’ll feel lost for any nontrivial task in Linux. Some “introduction to Linux” articles tell you it’s not really needed (depending on the distro you choose), but I disagree, and think you’d get frustrated unless you learn to use it.
  2. SSH. Related to the Command Line, knowing how secure shell works is essential to managing a remote Linux instance (e.g. a VM in the cloud). This includes knowledge on managing SSH keys.
  3. Nano or Vim or similar. Also related to the Command Line. Often you’ll have to edit a config file from the command line, and being able to do that confidently is quite helpful.
  4. File System Hierarchy and Permissions. Knowing where to find stuff (and who has access to it) is essential to be productive. On a specific note, it seems important to know where things will be logged (e.g. where does a package install or server software keep its logs).
  5. Package Management and Installing Software (and troubleshooting that when it goes awry). Most interesting tasks on Linux require installation of libraries and software, and quite often this can go awry. You need to learn how to debug this.

My advice, at least to myself, is to sit down and carefully master these first. At least to some degree. Only then will other tasks on Linux (e.g. managing an NGINX server) not be a frustrating job anymore.

Learn to Learn

So how do you most efficiently climb this learning curve? Discoverability of essential info on Linux can be a bit of a problem. But here’s a shortlist we came up with:

  • man can be used with any other command as an argument, and it will explain all about it
  • info is GNU’s answer to man, intended to be more fully-featured (hyperlinks and such) and comprehensive
  • The “bropages” is like man but more succinct and example-based
  • locate, find, and which are commands for finding stuff on the file system
  • aptitude in Debian distros, or a similar tool for your set of distros, to help understand the package system
  • unix.stackexchange.com can be a great generic resource for Linux (and other *nix OSes)
  • https://askubuntu.com/ is quite a vibrant community should you choose to use that distro
  • LPIC (or similar) exam objectives can be a great study guide
  • read shell scripts before executing to learn
  • and as a final trick, you could do git init in a certain folder (e.g. /var/log) and use diffs to check how things change following your actions

However, perhaps unsurprisingly, the most common piece of advice when asking experts “How to learn?” is…. practice. Practice, a lot!


PS. This was cross-posted to Infi’s blog.

Beginnersplaining Linux to Experts

Working at Infi I’m involved in several study groups, one of which is about Linux. When we started the group it turned out we had six people and six different levels of experience. And I was the absolute newbie of the group.

We decided to set up a program divided in weeks, with one subject for each week, and a “Lead” for each subject. The Lead would research a lot about his or her main topic, and ask the rest of the group to merely do some light recommended reading. This is to get everyone at a base intro level for each topic. Every week we’ll have a session where the Lead would talk about his or her research, along with some open discussion.

Obviously, the first topic would be a “Linux Basics” session. It also seemed logical that the newbie (me!) would pick up this topic, because I’d have most to gain from researching the hell out of it.

Seems legit, right!? Except I now realize this means I’ll be presenting on Linux Basics to five colleagues that know a lot more about this topic than I do. Oh, and because it’s the first week’s topic I have only a week to prepare. Whelp!

I’ll just have to focus on learning a lot from all this. No progress without failure, and no progress without taking risk, I guess.


Foot Note: The Programme

We composed the Study Plan based on whatever the group members individually found interesting enough to research. This means it’s a bit of a weird assembly, but interesting nonetheless:

  • Week 1: WTF is Linux?
  • Week 2: Command Line
  • Week 3: File Systems
  • Week 4: Screen
  • Week 5: Web Servers (Apache & NGINX)
  • Week 6: Ansible
  • Week 7: .NET Core
  • Week 8: Logging & Smart Monitoring
  • Week 9: KVM, Virtualization, Containers

Entity Framework: Cascading Delete of Optional Related Entity

After several years of NHibernate, and a couple of years Dapper and NoSQL, I’m now working on a project that uses Entity Framework as its ORM. It’s a mature ORM at this point. However, it does give me a headache as I’m struggling to find ways to do certain things. I’ll admit that I’m trying to dive in without sitting down and doing a few hours of learning first; for sure I’ll be on Pluralsight some time soon.

Fair warning: what comes next is a highly specific, rather technical, and possibly stupidly uninformed dump of a problem I ran into. Feel free to skip this one: no hard feelings, and I’ll see you on my next post!

The main problem: I’ve got a repro, but it’s extremely similar to various other questions on Stack Overflow. Except… that my code contains the accepted (and often highly upvoted) answers’ code as well, but still doesn’t work as advertised!

What I’m trying to do is make sure that EF will delete a “Child” property (i.e. the database row) automatically when its “Parent” is explicitly deleted via the DbContext. Note that the Child is optional in my scenario.

Here’s the repro. Create a new class library and install EntityFramework (I used 6.1.3) and NUnit (I used 3.6.1). Then drop in one namespace these entities:

And then this DbContext:

And finally this TestFixture:

Make sure the “TestDb” database is available on your “(LocalDb)\cascades” instance (or use another Sql Server instance and database). Then run the tests, and you’ll get:

Test Failed – Delete_will_cascade.
Message: “Child”.
Expected: 0, but was: 1.

All I want is that a “Child” is deleted with its “Parent” once that is deleted. I know I can use a Sql CASCADE, and I know I could manually remove the Child from the context, but I want EF to handle this automatically, damnit!

For sure I’ve missed the obvious solution. I was somewhat hoping it would come to me while writing this. But perhaps I just need a good night’s rest.


References:

Git intro for TFVC users

So, you’re using Team Foundation Version Control (TFVC). You know about Team Projects and Collections, have a “stable” and “dev” branch for most projects, know how to do basic merges, and know how to shelve and unshelve changes. But you only have superficial knowledge of Git.

Well, then you’ve come to the right place: my Git intro for TFVC users.

Disclaimers

Here’s a heads-up about this particular post:

  • It is not in-depth;
  • It will oversimplify things to the point where not every statement is technically true;
  • It does not teach you actual Git skills or commands;
  • It is somewhat subjective.

Oh, and in my humble opinion: Git has a crazy learning curve. So buckle up!

And, as a final disclaimer: I’m writing this because I want to be able to explain the basics of Git, and certainly not because I’m an expert. In fact, I know more about Mercurial than about Git, I have worked mostly with TFVC in the past year, and would have to look up nearly every Git command when using the command line (I prefer GUI tools most of the time). Just so you know.

Disclaimers done, let’s get started!

On “TFS” vs “TFVC”

First, let’s get the TF* terminology right. These terms are different but related things:

  • “TFVC” stands for Team Foundation Version Control, and is the actual system for keeping history of your codebase;
  • “TFS” stands for Team Foundation Server and is the “environment” (if you will) in which source control features come together.

Many people, myself included, often use the acronym “TFS” when we actually mean “TFS with TFVC”. This is probably because TFS is very often used with TFVC as the version control system; but note that you can also use Git with TFS.

This blog post focuses on TFVC (which almost always implies you’re using TFS too).

Why Learn about git?

The personal reasons for learning Git are quite simple: it’s the de facto standard for version control. Knowing about Git is:

  • crucial for your career (your new employer is likely to use Git);
  • crucial for talking to new hires (who will very likely know Git);
  • crucial for efficiently navigating open source.

The intrinsic reasons for learning Git all come down to the fact that it is insanely powerful (which also accounts for the steep learning curve). After having worked with TFVC in a 12 person team for over a year, I’d like to highlight the following main- and most direct advantages over TFVC:

  • Cheap branching;
  • Small repository size;
  • Local commits;
  • Better options for “shelving”;
  • Speed;
  • Better “offline” support.

Beyond these advantages, which you’ll get if you’re using a “central” Git repository, there are even more goodies if you tap into the distributed nature of Git, as well as the more powerful commands (e.g. to rewrite history).

Basic differences

Git is a lot like TFVC, in that it is also a Version Control System (VCS). It is also quite different. Here’s how they compare when managing the code base and doing changes:

TFVC Git
There is a central, server-hosted Team Project and you’ll have one or more local workspaces containing a copy of all the code. For now, let’s assume that there is a central repository hosted somewhere on a server. You’ll have one or more local “clone” repositories containing a copy of all the code and also all of its history.
check in is a command to send your pending local changes to the server where they will be committed to the version control history. You commit changes locally which creates a “change set” private to your “clone”. You can do this multiple times. You push one or more change sets at once to the central repository.
You can Get the Latest Version from the server which directly tries to merge with your current state. You fetch changes from the central repository and merge with your current state (or do both at once by doing a pull) possibly creating a new commit.

The fact that a TFVC “check in” is multiple separate commands in Git gives several advantages:

  • You can build history in small, individual steps (commits), which you can undo individually in several ways, and you can apply individual commits to other branches.
  • Your changes are “safe” in commits when you want to send your changes to the central repository and find out others have conflicting changes, by default they won’t get “lost” if merges go bad. With TFVC, you’re required to resolve conflicts as you try to check in, which can screw up “unsaved” changes.

Our next set of differences would be about branching, but before that it’s good to talk briefly about “shelving” changes.

Setting changes aside

With TFVC you can shelve changes you currently have to safeguard them, optionally reverting those changes in your local workspace. You don’t necessarily need to do this when switching work to another branch, because the branch is typically a sibling folder of the main branch. More on that later.

With Git, you can stash changes you currently have, reverting changes in your local clone. You have to do this before switching to another branch. In order to see how that works, let me move on to the next topic: branches.

Branches

A typical setup in TFVC starts like this (with a local workspace matching the Team Project 1-on-1 in this example):

Inside the project folder for the Team Project, there immediately is a sub folder called “main”. This is done so that it is easy to branch off the entire codebase for that project into this:

The folder “dev” is now a complete copy of “main”. This also means you could be working on two branches simultaneously, and you can check in files to both branches at ones if you so desire. You could even have “main” and “dev” at different points in your version control history.

Git is different.

With Git, the “main” folder as you’d have it in TFVC would be pointless. Instead, there is just:

You can “branch off” any state of “project-x” at any point in time. Your folder “project-x” will point at a certain state, de facto having the code for a specific branch.

If you would like to have both branches “ready for action” on your disk, you would typically have multiple “clones” of the repository. One would be at the most recent state of the “main” (typically called “master”) branch, and another might be at the most recent state of another branch.

As a summary, Git branches relative to TFVC branches:

  • Are light-weight and can be used to “switch context” for example to work on a feature;
  • Are a top-level thing, as opposed to the “path-based” branches in TFVC;
  • Allow for more precise merges and “cherry picking” of commits;

These differences allow for completely different workflows with Git. This is a topic for another post though, if you’re interested I’d recommend research things like “Git Flow”, “GitHub Flow”, and “GitLab Flow”.

Other differences

While there are many other differences, both small (e.g. specific commands) and big (e.g. the “distributed” nature of Git), this post will keep it at the above. Mentioned differences are in my opinion the most “direct” and eye-catching differences. If you want to learn about the other differences I recommend you first get started with some practical skills, e.g. by following a tutorial.

Conclusion

TFVC is a mature, decent version control system. But personally, having worked with both centralized and distributed version control, in TFVC I’m misssing:

  • Ability to do commits locally;
  • Cheap, more powerful branching;
  • Great “shelve” options;

Those three, in addition to its “distributed” nature enabling online platforms like GitHub to flourish, are likely the reasons Git is so popular nowadays. In my opinion those are great intrinsic reasons to learn Git when you’re currently using TFVC (even if you cannot switch on the short term), and if not for those reasons then because it’s crucial for your career.

So ready yourself for a bad-ass learning-curve climb, and start learning more about Git!


Resources & Further Reading

Here are some links to continue your journey: